Interface > Advanced Search
The advanced search tab shows all transactions for all carriers regardless of status.
The following options are available when working on the advanced search tab:
- Branch: The Branch
 list box in the upper left can be used to select a branch to narrow the search results. Once a branch is selected interface files tied to the selected branch are displayed.
- Showing Page: The Arrow

 icons can be used to navigate through pages of search results.
- First Page
 icon.
icon.
- Previous Page
 icon.
icon.
- Next Page
 icon.
icon.
- Last Page
 icon.
icon.
- Page List: Click the Page List
 arrow to open a list of all search results pages. Select the desired page number to open that page of search results.
- Search Filters: Click [Show] or [Hide] to toggle the Search Filters screen.
The options available on the Search Filters screen are:
- Save Filter Settings: Selecting the Save Filter Settings check box on the Search Filters screen and clicking Search will change the default Search Filter setting. The next time the advanced search tab is opened, the files returned will be filtered by the saved setting. Exercise caution when using the Save Filter Settings check box with a date range as returned files will be restricted to that date range. As a general rule, check the filter settings each time this tab is accessed.
- Interface Type: Select the type of transaction the carrier is sending.
- Import Status: Select the status of the import that identifies the status of the transaction.
- Interface ID: The
interface ID is a number assigned by Nexsure to make it easier to track
specific downloads. Numbers
are generated in the order received.
- File Type: The
different file types are Daily Download,
FSC Quote and Initial
Load.
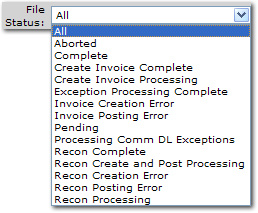
- File Status: Select a File Status from the list. The available options are:

- Premium Amount: This it the total premium amount for the policies located within the file.
- Client Name: Enter the name of a client to return results that include all files for a particular client. Enter at least two characters to narrow the search results. Entering some of the Client Name returns a broader result; enter most of the name for more specific results.
- Policy Number: Enter at least two digits of the policy number associated with the file. The more digits of the policy number entered the narrower the search results.
- LOB: Enter the line of business for the interface files. Enter at least two characters to narrow the search results. Entering some of the line of business title returns broader results, enter most of the line of business for more specific results.
- Branch Code: Enter the Branch Code. This is typically identified as the code number assigned to the agency by the carrier. The code is also known as the Producer Code.
- Carrier: The carrier name for which the data was downloaded.
- Commission Amount: This is the total commission amount of a commission download file. The commission amount will only display on commission download transactions.
- Eff. Date (Fr): Click the Calendar
 icon to select the beginning date in a date range. A date range can be selected to return all policy downloads with coverage effective dates in the date range. Click the Variable
  icon and enter a variable number of days to set a continuous date range to be used with Save Filter Settings. Enter + or - and the number of days up to three digits. The date will then be + (after) or - (before) the current date.
- Process Date (Fr): Click the Calendar
 icon to select the beginning date in a date range. A date range can be selected to return all interface files with process dates in the date range. Click the Variable
  icon and enter a variable number of days to set a continuous date range to be used with Save Filter Settings. Enter + or - and the number of days up to three digits. The date will then be + (after) or - (before) the current date.
- Import Date (Fr): The date the download was received. Click the Calendar
 icon to select the beginning date in a date range. A date range can be selected to return all files with import dates in the date range. Click the Variable
  icon and enter a variable number of days to set a continuous date range to be used with Save Filter Settings. Enter + or - and the number of days up to three digits. The date will then be + (after) or - (before) the current date.
- Complete Date (Fr): The date the transaction was completed. Click the Calendar
 icon to select the beginning date in a date range. A date range can be selected to return all files with complete dates in the date range. Click the Variable
  icon and enter a variable number of days to set a continuous date range to be used with Save Filter Settings. Enter + or - and the number of days up to three digits. The date will then be + (after) or - (before) the current date.
- NAIC: Enter the carrier’s NAIC code as provided by the carrier.
- Eff. Date (To): Click the Calendar
 icon to select the ending date in a date range. A date range can be selected to return all policy downloads with coverage effective dates in the date range. Click the Variable
  icon and enter a variable number of days to set a continuous date range to be used with Save Filter Settings. Enter + or - and the number of days up to three digits. The date will then be + (after) or - (before) the current date.
- Process Date (To): Click the Calendar
 icon to select the ending date in a date range. A date range can be selected to return all interface files with process dates in the date range. Click the Variable
  icon and enter a variable number of days to set a continuous date range to be used with Save Filter Settings. Enter + or - and the number of days up to three digits. The date will then be + (after) or - (before) the current date.
- Import Date (To): The date the download was received. Click the Calendar
 icon to select the beginning date in a date range. A date range can be selected to return all files with import dates in the date range. Click the Variable
  icon and enter a variable number of days to set a continuous date range to be used with Save Filter Settings. Enter + or - and the number of days up to three digits. The date will then be + (after) or - (before) the current date.
- Complete Date (To): The date the transaction was completed. Click the Calendar
 icon to select the beginning date in a date range. A date range can be selected to return all files with complete dates in the date range. Click the Variable
  icon and enter a variable number of days to set a continuous date range to be used with Save Filter Settings. Enter + or - and the number of days up to three digits. The date will then be + (after) or - (before) the current date.
- CarrierSeqNo: Enter the transaction sequence number assigned by the carrier.
- Sort Filters: Use the Sort Filters to sort the results of the actions search.
The options available on the Sort Filters screen are:
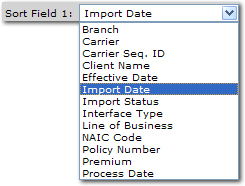
- Sort Field 1: By default Sort Field 1 is set to Import Date. However, another column heading from the Sort Field 1 list may be selected. The search results will be sorted by the column selected in the Sort Field 1 list:

- Sort Order 1: By default Sort Order 1 is set to Ascending. However, either Ascending or Descending may be selected to set the order of the download files returned. Ascending will set the order from A-Z. Descending will set the order from Z-A. The Sort Field 1 will be the first sort and Sort Field 2 will be the sub sort.
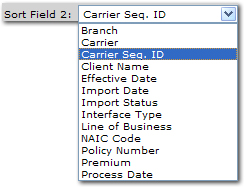
- Sort Field 2: By default Sort Field 2 is set to Carrier Seq. ID. However, another column heading from the Sort Field 2 list may be selected. The search results will be sorted by the column selected in the Sort Field 2 list:

- Sort Order 2: By default Sort Order 2 is set to Ascending. However, either Ascending or Descending may be selected to set the order of the download files returned. Ascending will set the order from A-Z. Descending will set the order from Z-A. The Sort Field 1 will be the first sort and Sort Field 2 will be the sub sort.
- Files Per Page: By default the Clients Per Page is set to 10. However, 5, 10, 25, 50, or 100 records may be selected to display per screen.
- Search: Click Search. The results of the Search Filter criteria and Sort Filter settings are displayed.
- Clear: Click Clear to remove all entries in the Search Filter and Sort Filters fields.
Important: Clicking Clear does not remove the Save Filter Settings selection.
The following options are available when viewing the search results:
- Client Details - The blue Details
 icon will open the client card file tab.
- Details -
The white Details
 icon will open the interface details screen. It
displays each download for that particular carrier.
- Delete Clicking
the Delete
 icon will delete the download.
The following options are available on the Navigation Toolbar when viewing the search results:
- Summary: Click this link to return to the download summary tab.
- Accept Process selected interface exceptions.
- Reject Reject selected interface exceptions. The transactions will still be displayed but will show the following message in red: The import file has been rejected by the user.
- Remove Remove selected transactions from the interface screen.
- Print Print a report of interface transactions found in search results.
Tip: Use the web browser print function to print a hard copy of the report.
IVANS
Downloads
Importing
FSC Quotes
 arrow to open a list of all search results pages. Select the desired page number to open that page of search results.


 icon will open the interface details screen. It
displays each download for that particular carrier.
 icon will delete the download.